Connection Instructions
Connections
Below are the various connection methods available. There can be a variation in the colour of the sensor wire in US and UK chargers, but the brown positive and blue negative wires remain the same.
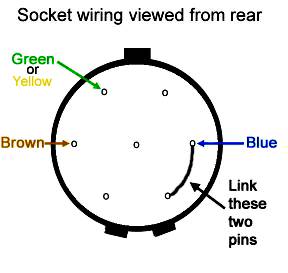
On the right you'll see the connections from the new charger lead if soldered directly to the rear of the existing Giant/Panasonic socket. You can just cut off the screw fastened NTC connector supplied. In practice the two linked pins indicated can be directly soldered together with the blue lead attached. This is the neutral connection with the neutral return of the battery's temperature sensor. The green wire is the other sensor lead, and the brown is the conventional positive. If you are nervous about soldering and don't want to risk damaging the original socket, use the flylead method detailed below, or buy a new socket.
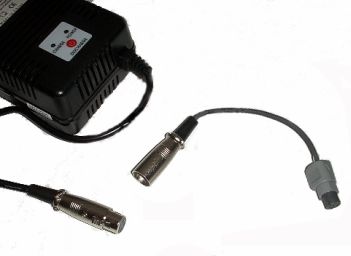
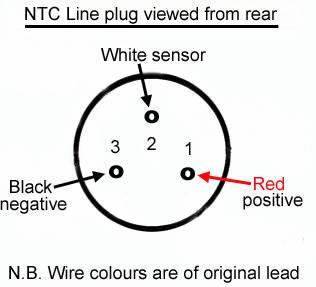
The flylead method. If you want to have two chargers, say one at work and one at home, the lack of a second socket to plug into the battery is a problem since those 7 pin sockets are not freely available. The simple solution is to mount the original Panasonic socket and a short stub of it's grey lead into an NTC plug and use NTC sockets as supplied on both chargers. Then this flylead can be with the bike to enable connection wherever you are. A source for these is shown below The connectors illustrated at the side are XLR types, but the NTC are connected in the same way. The connections for the NTC plug are as shown on the right. The yellow wire of the original Panasonic lead is cut right back as shown in the strip connector below. If you wire a second charger of this type with the corresponding NTC socket, the connections will be the mirror image of these, but will be the colours of the charger cable, Brown positive to pin 1, Blue negative to pin 3, and Green or Yellow sensor wire to pin 2. When you assemble the plug, add some insulating tape around the thin outer of the Panasonic grey wire to ensure the cable clamp holds it firmly to avoid any wire
27.9.2010
.
breakage in future My thanks to Chris Saville for the information on the US sourced Powerstream charger's NTC wiring. Alternative connectors are the similar XLR items as shown in the flylead photo above, available from Maplin, socket code BW91Y and plug code BW89W.
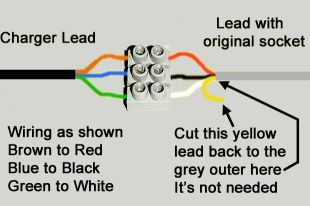
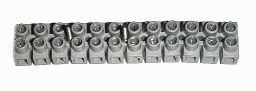
If you cannot solder the plug onto the charger lead and don't know anyone who can do it for you, all is not lost if you can wire a plug. At your local DIY in the electrical section, you should see some plastic connector strip like that on the right. Buy that and cut off a section of three connectors, it's easy to cut the separators with a small hacksaw or craft knife.
Bare the outer and strip the insulation from the wires of both the black charger lead and the grey original lead that connects to the battery. Strip enough insulation from the original wire for you to twist the wire strands together and fold them back to double the thickness. Undo the screws in the connector strip and fasten in the leads as shown, making absolutely sure that the connections are well made, especially the green and white wires. Remember, the green wire may be yellow instead on some chargers. Cut the original Panasonic yellow wire all the way back as shown, it's only used on other bikes that use that charger and goes nowhere. Now thoroughly bind this whole connection with PVC insulating tape like that shown on the right. You can also get this from your DIY. Make sure that the binding end to end is sound and try to form a continuous tapered sheath between the two outer cables to prevent any pulling apart.
Thanks to the diligent detective work of Sparky5, a pedelecs forum member, we now know what this this non standard DIN style socket is. It's produced by Hirose of Japan and it's available as RPC2-12P-7S. A Google search on this number will show various US sources, but in the UK they are available from Farnell. These are now available for anyone to buy individually if wished.