Modifications

Around my area there are many shared footpaths, sometimes with confined areas where accurate trailer following is essential to avoid the risk of the side of the trailer touching a pedestrian. A high mount on the saddle stem is unacceptable for heavy loads, and a side hitch incurs the trailer cutting corners, so I designed this centre hitch. On a normal bike this would lead to problems with counterbalance, but on an electric the battery and motor weight take care of that. I can still beat cars away from the lights with heavy loads and wheelies!

The very secure attachment is by a car style towball which I salvaged from a cheap French trailer. I added a plastic collar and radio control knob stuck on with Araldite for grease free operation, since the upper arm has to be swung back against spring loading for attachment of the trailer. As said, it's totally secure and gives instant trailer attachment and detachment.
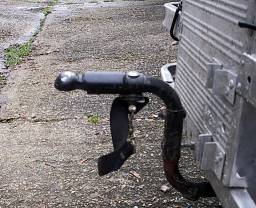
The other half is this cup head attaching point on the trailer, to which I've added a security strap with dog collar style clip which you can see hanging, but clipped up in the storage position. The tube bolted under the trailer has an additional front bolt bracing from the swan neck to the body to make it rigid.
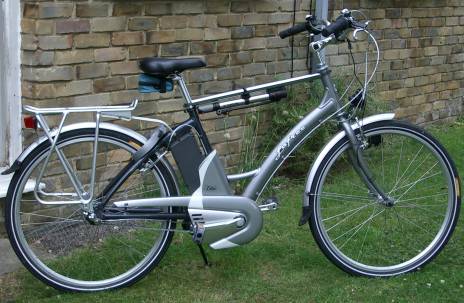
When I bought the bike, there were only step-throughs in stock at the time, but I accepted that and added my own crossbar. I think the straight crossbar looks much better than the cruiser style curved one and is more practical since a pump can be attached as here. The tubing was a metre length of 1" chrome plated tubing from a DIY store. It was cut to end up as an over tight fit between the headstock and the bottom of the seat tube once the ends were profiled into
The hitch is made from 3 mm dural plate and attaches to the carrier as shown since its mountings are more than adequate. As a utility bike, it normally wears large panniers so these hide the whole front area of the hitch plates, and the protruding remainder is often not noticed, even by other cyclists surprisingly, until the feature is pointed out to them.
a curve to mate with the tube curvature. Then the ends of the tube were plugged with hardwood plugs shaped for the purpose. A pair of jubilee clips were drilled to accept screws and the holes contersunk slightly internally. The clips were then firmly screwed onto the ends of the metal tube, the front offered up to the headstock tube and the rear forced down the seat tube thus braced between them. The jubilee clips were then tightened firmly at both ends. This sort of chrome tube is not outdoor quality and it's essential to give it an appropriate finish. First the jubilee clips were painted with a matching silver grey, then the tube was finished with two coats of clear lacquer spray of the type sold by Halfords etc for the final finish over car polychromatic paints. This type of lacquer is soft initially and needs about two or three days to harden well, so it needs careful handling initially if it's not to be peeled by careless accidental contact.
First the purchase. In 1993/1994 the hub with a twistgrip change cost Ł159. There's a trigger change option as well. The UK agents for SRAM are Fisher Leisure and all good cycle dealers have an account with them. You will need to have the hub built into a rim, and it's not worth salvaging the old one, since even a high quality Mavic rim isn't dear. A dealer with the necessary wheel building skills will probably charge around Ł25/Ł30 for that service, including spokes. He may have difficlty in getting heavy duty spokes but that doesn't matter, the strength of a wheel being down to the build quality, the spoke gauge being relatively unimportant. (A fact proven many times). When you receive the wheel, take care at all times with the thin and delicate hub actuator rod and it's integral spring since this won't be protected until the hub is fully fitted and ready for use with the actuator box on.
The hub is supplied with a black cable which didn't match my silver Twist one and the SRAM cable is too short for the longer wheelbase Twist anyway. You can start with a new cable, which is the easier option, and this needs to be some 8 inches/20 cm longer than the old one, or modify the existing one as I did, a tricky job. Either way, first you need to part the main plastic casing halves around the motor/crank assembly by undoing the peripheral screws. Then the cable inner needs to be disconnected completely at the rear from the hub and all fastenings removed so the cable is now free from the bike. Now the inner cable has to be disconnected from the Nexus grip, it's quite easy to unhook the end nipple. Next there's the tricky bit of fitting the original inner cable nipple to the SRAM twistgrip, working through the end hole it's can be very difficult to get the cable nipple to engage in it's recess on the rotor, not a job for the impatient, though you might be lucky and get it hooked first go!
The cable is normally routed under the motor/crank casing, and a new longer one can also take that route, but if using the existing one that must change, so the following paragraph applies just to that.
The SRAM hub actuator demands a long protrusion of the inner cable and to achieve that with the existing cable it's necessary to withdraw the inner cable from the outer around 6 inches/15 cm so that the outer can be cut back by exactly 4 inches/10 cm. Before withdrawing the inner, make sure the Bowden strands aren't frayed as they'd lock in the outer if they were. Once the outer is cut back and the end ferrule refitted, the cable routing must be changed before fastening it to the frame in order to regain the cutback length. This time, route the cable OVER the crankcase on the left hand side of the bike, past the thin electrical wires, crossing over from left to right above the frame tubes ahead of the rear mudguard, and then along to the hub actuator.
Now with either cable type, fit the cable to the actuator. Remove it's top plastic window and lift out the centre brass boss. Thread the cable through the adjuster and into the actuator body, then thread the inner into the brass boss and adjust it to achieve a full anti-clockwise turn around the actuator pulley. Tighten the brass boss screw to lock the inner cable, replace the cover and check for correct length by following the adjustment routine detailed in the hub instructions. If necessary reset the inner lock point in the brass boss, then cut away any surplus inner.
Lastly refit the plastic casings around the crankcase. I found it best to leave the cutout for the cable's previous position for use by the electrical cables which were previously just trapped under the edge rubber strip. To accommodate the new slightly different position of the outer cable, I use an round file to groove the edge of the left hand casing just above the old position, leaving the rubber strip edging to take up the profile of that when the casing was replaced. Refitting these casings is notoriously fiddly, somehow they seem to fit so perfectly when being removed but appear to have changed shape when it's time to refit them! Again it's just patience and persistence that's needed.
When first trying out the hub on the road, the change may be very sticky at first, and it could be very difficult to get the lowest gear. Be patient and allow extra time for each change and assist them by a fractional back pedal with each one. The hub soon runs in and the change improves, but it will never have the slickness of the best Nexus hubs. One adjusts to that with use and the hub's other benefits of very wide range and total reliability far outweigh that slight inconvenience.
The standard sprocket supplied is a 19 tooth which gives a reduction of the Nexus low gear from 43” to 31”, fractionally reducing the top gear to 77” with the 15 mph limit fractionally reduced. A 17 tooth sprocket will reduce the bottom gear from it's 43” to 34” and increase the Nexus top gear to 86” with assistance to just about 17 mph, and I've found that the best choice for near universal hill climbing and trailer pulling but with increased speed as well. Sprockets from both SRAM and Shimano will fit, and are available down to 14 tooth. However, the motor's absolute maximum of 390 watts peak power is the limiting factor against air resistance on the flat, so gearing it much higher might not be productive. Later twists for the US leisure market had the SRAM as standard, geared for 20 mph, but they were without mudguards, dynamo lights, reflectors and carrier so were under 20 kilos. Sprockets are easy to fit, but difficult to remove due to the very strong retaining circlip with little to get hold of for removal. Watch out for tool slip and potential hand and eye injuries. Even though there's no tips provided for it, a large size circlip expander helps a lot if available.
Last update 17.5.2007
.
.
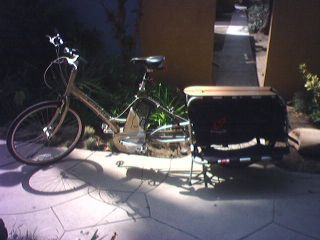
Here's a photo of William Morrison's bike with it's Xtracycle attachment conversion. He uses it as a Los Angeles commuter, but originally built it as a silent camera car to shoot the Medoc Marathon in France and says it worked very well with a full load of himself, camera, sound and the rider.
A very good application for the Giant Lite William.
He's currently planning on conversion to the SRAM DualDrive system giving a very wide range of gears. It should have the potential for some high assisted speeds then, the long wheelbase good for stability.
A very good application for the Giant Lite William.
He's currently planning on conversion to the SRAM DualDrive system giving a very wide range of gears. It should have the potential for some high assisted speeds then, the long wheelbase good for stability.
A Twist user, "Grandad", has created an ingenious coupling and mounting method for a second battery giving double the range. All the information you need to duplicate this for yourself is on his second battery website page.