BIKE
You may experience binding of the freewheel action causing the pedals to turn when wheeling the bike forward, or in extreme cases, throwing off the chain when backpedalling on the road. The cause is the plastic guard disc that sits behind the sprocket cassette. There's a widespread consensus in the cycle trade that this was not one of Shimano's better ideas. There's little clearance at the rear of the back sprocket, so when dirt and oil accumulate between it and the plastic disc, the two bind together. In addition, some oils and cleaners cause the plastic to soften and buckle, worsening the problem. The answer is to get rid of the disc and keep the derailleur properly adjusted. If you're not sure how, any cycle dealer will remove the plastic guard disc for you, or if you'd like to do it, these are the tools you will need:
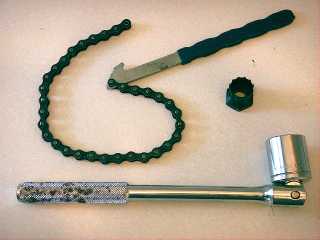
A chain wrench, a cassette removal adaptor and a ring or socket spanner to fit the adaptor. The first two can be purchased from any good cycle dealer. To use, with the bike inverted, first disengage the rear brake cable by pulling the actuator rearwards and upwards, then undo the anti torque arm bolt and remove the back wheel.
Now wrap the chain around the largest sprocket of the cassette in the direction shown in the photograph, and engage the chain with the lever hook so that you can use the lever to prevent the cassette turning backwards. Slide the splines of the removal adaptor into the cassette end, place the spanner on the hexagon head of the adaptor. Brace the wheel against the ground while holding the chain wrench lever with one hand and use the other hand on the spanner to undo the cassette retaining nut. Remove the first two sprockets which are loose, then the remaining cassette block. Now you can remove the plastic guard disc and scrap it. Replace the cassette block and loose sprockets by aligning the narrow spline correctly, making sure the two loose sprockets have the step inwards, then replace and tighten the retaining nut. Refit the rear wheel, brake anchor bolt and actuator and start enjoying a freewheel action that works as it should.
Updated 22.11.2006
.
First question whether you really need to remove the wheel completely. By unhooking the cable harness from it's attachments on the fork and frame, tyres and tubes can easily be replaced with the wheel alongside the bike. Broken spokes and wheel truing can be dealt with easily with the wheel still in the bike, and only a complete wheel, motor or rim replacement calls for full removal.
If necessary however, to completely remove the Torq front wheel, first remove the battery from the bike. Go to the insulated cable sleeve alongside the offside front fork, cut the two end tie-wraps, then carefully cut away the insulated sleeve without damaging the wires. Inside you'll now see three fat power wires with plug in connectors and five thin hall effect control wires which are normally solder connected. Remove the insulation which surrounds each of all those wires. Look at the colours connected, they are normally like for like in which case there's no problem, but if not, note down which motor lead colours go to which bike cable colours. Next, unplug the thick power wires, the connectors can be quite tight. Now unsolder the thin wires and pull apart their joins.
To remove the wheel, first disconnect the brake cable by pulling back the outer at the V brake end and slipping it out of it's slot. Now undo and remove the Allen bolt that locks the anti-rotation plate. Undo the wheelnuts, it's an 18 mm spanner size, and lift out the wheel. Remove the wheelnuts, washers, locking plate, cable shield and plastic collar, making a note of the order and direction of these and what goes inside or outside the forks. Those on the cable side can be slid all the way over the cable to remove them. Temporarily tape up the loose cable ends to protect them if the wheel is to be transported. If the wheel is to given to a cycle dealer for attention, stress to them that the cable must never be pulled upon as any break inside the spindle cannot be repaired. Once the wheel is returned, reverse the procedure, not forgetting to fit and secure the anti rotation plate, and remembering to replace all the spindle components on the cable side before connecting the wires.
Carefully separately insulate every wire join after soldering and plugging, using pvc insulating tape, then put the battery in and test the motor to make sure it turns the wheel ok. Remove the battery again and bind the whole join together. That's best done with the self amalgamating tape I recommend on the site, stretching it as you go, but at a pinch you could use pvc insulating tape although that's very much second best. Either way, start binding at the bottom so that the overlap as you bind shields each edge join from water ingress. If you use pvc tape, bind the end at the top when you've finished with a tiewrap to stop it unwinding due to weathering. Job done.
Front brake juddering has a number of possible causes, and one of the components used on Torqs and Quandos can be a contributor and need to be changed. First however, check that all other causes are eliminated. Start by ensuring that the rims are thoroughly cleaned, and if found to be contaminated by oil or any stickiness, the brake blocks should be removed and washed as well. Solvent cleaners can be used on the rim, but not on the brake blocks. Then with brake blocks in place, carefully align them with the rim. To do this properly is a fiddly job since the seating allows movement in all planes. Adjust the height and vertical rotation to ensure the pad surface is square to the rim, contacting the rim without overlapping the edge or hitting the tyre wall. Then set the pad surface to be very slightly toed in at the front so that the front leads when contacting the rim.
The side to side setting might need to be adjusted using the two grub screws next to the arm pivots, screwing in to move a side outwards. If it's found difficult to achieve a balance, the screws may both be too far in and fighting each other, so slacken both off a little and start adjusting again. Now the overall cable adjustment can be carried out at the brake lever adjuster, but if this adjustment is found to be used up, a coarse adjustment should be done first by slackening the inner cable clamp at the brake end and pulling through some inner. Then the fine adjustment can be completed at the lever adjuster.
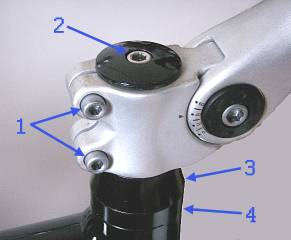
Slack headstock bearings will contribute to juddering by allowing the forks to move in the frame when the front brake is applied. These bearings always bed in rapidly when a bike is new. You can check for slack by holding the front brake on and rocking the bike back and forth to detect movement. To adjust the headstock, slacken the Allen bolts (1) to allow some free movement on the stem, then tighten the Allen bolt (2) which presses down the taper collar (3) and tightens against the top bearing (4).
Now lift the front of the bike by the crossbar and turn the front wheel from side to side, ensuring that the movement is smooth with no jerkiness or tendency to lock at one point. If either are detected, slacken Allen bolt (2) until the movement is smooth. Now realign the handlebars and tighten the two clamp bolts (1).
If after all these adjustments a judder still persists, the Diacompe SE8 brake levers will need to be changed. eZee have found that the short travel of these levers can give rise to conditions causing judder, and have arranged that replacements will be made where necessary. For this, please go to the 50cycles website report form and complete it.