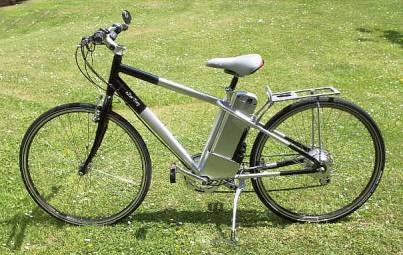
Project T bike, the Torq Radical
Having completed my Q bike which provided for all of my cycling needs, I was left with the question of what to do with my Torq. As a completely legal machine, the one thing the Q bike couldn't do was high speeds, and since that was a strength of the Torq, the answer for me was to build on that strength to make an uncompromising fast bike and at the same time, deal with the known problems, the same philosophy that I followed with the Q bike.
First, those issues, all of which are well known. The one that was most important for me was insufficient steep hill ability, since I live in a very hilly area, and I wanted at least a couple of percent improvement in gradient handling to make a 14% that I found difficult more like a 12%. Those who've changed the gearing on their torqs have discovered that it's chain line is compromised, being lined up only in top gear despite the chainwheel being very close to the battery. Another thing that troubles somewhat when poor roads are ridden is the discomfort due to the high unsprung weight of the front motor sending shocks up through the bars, and then there's the issues of front brake judder and the weak rear roller brake.
There was a single simple (?) answer to the latter three, I put the front wheel in the back and the back wheel in the front of the bike. Well, I did warn you that it was radical, but don't worry, no cause for alarm, I still face the same way when I'm riding!
No more shocks up through the bars, a front brake that works without judder, no more rear roller brake, and a motor that's tamed by rider and battery weight.
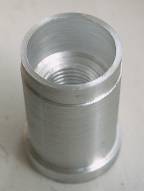
Unlike the Quando which has this motor with a long spindle, I somehow had to add to the short right hand motor spindle a freewheel thread and a six sprocket freewheel while leaving enough thread for a wheel nut. The freewheel mount was machined from a DMR revolver
Unlike the Quando which has this motor with a long spindle, I somehow had to add to the short right hand motor spindle a freewheel thread and a six sprocket freewheel while leaving enough thread for a wheel nut. The freewheel mount was machined from a DMR revolver
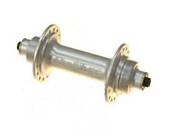
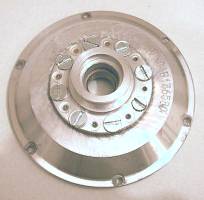
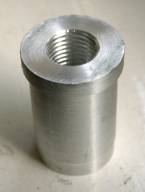
After stripping the DMR hub internals, the hub shell was cut in half and the right hand full freewheel side kept. Both the thread width and back freewheel support face were machined away to the minimum viable to restrict the overall motor hub width, and then the DMR's reverse was machined away to the flange. To allow exchange, I bolted this to the motor wall with a ring of 6mm bolts, the threads tapped into the motor's alloy side wall.
The result at the right shows both outer and inner faces of the motor wall. The attachment was supplemented for strength with an epoxy resin which could be loosened by heat over 60 degrees C if removal was wanted in future for replacement. You'll see the bearing on the right is protuding, this deliberate to minimise the motor width by removing a spacer from inside it.

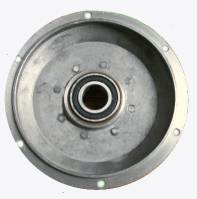
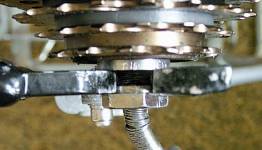
At the right you see the assembled former front wheel hub with it's freewheel in place. All the derailleur components for this bike are identical to the efficient ones chosen for the Q bike, with the exception of the chainwheel, kept as the standard 52 tooth. The components are the Shimano 13 to 34 tooth Megarange freewheel, the Shimano Acera rear mechanism, and the SRAM twistgrip shifter, and the gear ratios in inches are 42", 60", 68", 80", 96", 111". The first gear is really a "get me home", primarily for flat battery situations
As with the Quando motor, the right hand spindle is hollow and weak, but there was also the situation where the thread for an external wheelnut would be minimal. Therefore it was necessary to make the internal assembly independently secure. I used the same added boss technique to strengthen the spindle as in the Q bike, but for structural integrity I internally threaded it for the spindle as seen here. The left hand photo shows the recess that is a tight fit on the larger and stronger inner spindle section, while the right hand photo shows the outer end which braces against the frame dropouts. On the right you see the stepped wheelnut that I've made to make best use of the minimal thread available. The frame dropout has been cut away to provide an exact fit for the step and it's secure because of this, but if necessary I'll add an external lockring later.
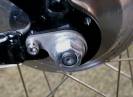
This next photograph shows the anti-rotation plate that was on the front wheel motor, now added to the left hand spindle to perform the same function for it's new rear motor role. As you see here, I tapped into the frame to provide the 6 mm metric thread for the securing bolt.
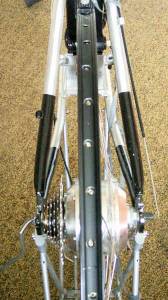
As with the Q bike, to correct the problems of the chainline and accomodate the motor hub, I reshaped the frame using the same techniques, so I won't repeat those photos. The photos alongside show the end results.
Left hand top shows the offset wheel build to correct the wheel centering. Right hand top shows the improved chainline, the chainring in line with the centre of the main five of the rear sprocket set, this also showing the much better separation from the battery carrier.
This is shown again, but this time from above in the photo below, where it can be seen that the chainring is now mounted on the outside of the spider, rather than inside as formerly.
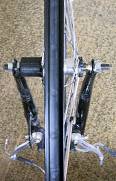
On the left you see the back wheel doing duty as a front wheel, which it's happy to do, little wonder as for the first time in it's life it can see where it's going! Seriously, there was no point in making suspect adapter methods of fitting a front wheel in the very wide forks when there was this perfectly good lightweight wheel available, environmentally better to use it again by removing the roller hub brake and the sprocket cassette. The offset build performs with perfect straight line stability and fast banked cornering in the front wheel role.
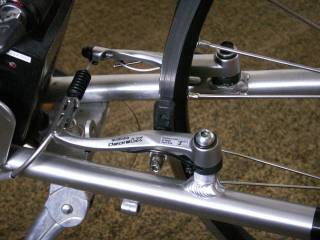
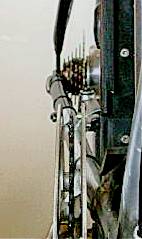
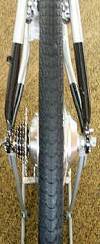
To look after rear braking I've reinstated the V brake that the Torq once had in it's prototype form. Since a rear brake noodle (the curved tube that carries the inner cable from the brake) exits on the right where it's almost trapped by the close inboard chainwheel on a Torq, it's likely that's why it was changed to the roller brake. My simple solution to that was to use a Shimano Deore MX 580 front brake there instead, since the noodle on that exits left where there's plenty of room with no chainwheel as the photo shows.
Since this is solely a leisure performance bike with no pretentions to utility use, the bike has been stripped of all unnecessary equipment for that role. As you will have noted, there's no mudguards, no lighting, no bell, no dynamo or bracket, the stand shown in the photo above has been removed as it's not needed and the seatpost has been replaced with a plain tube type with an integral clamp.
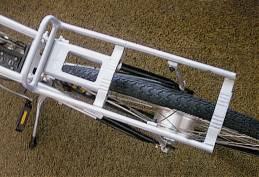
The carrier has been "skeletonised" as the heaviest thing it will carry is a spare battery. The main photo above showed it's simplified four post support, and the photo at the right shows how it's been shortened and pared down to the bare essentials. Originally with a 25 kilo rating, it's still easily good for 10 kilos, well over what it might ever be called upon to carry
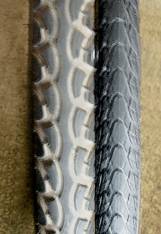
As previously, I've chosen the excellent Schwalbe Marathon Plus tyres, but to combine low weight and very low rolling resistance, in much smaller sections than previously. The widest 38 mm tyre is the one usually fitted on these bikes, but on the rear motor wheel I have a 35 mm running at 65 lbs, this perfectly comfortable with body weight taming the motor weight. The left hand photo shows the original Kenda with the 35 mm Marathon alongside, this size, tread and compound greatly reducing drag.
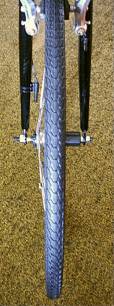
The rear tyre is seen in the centre photo. On the front wheel seen at the right I've gone for the smallest size made, 28 mm, running at 80 lbs pressure. There's no discomfort with this, the light front wheel somewhat akin to those used by club riders at up to 120 lbs. This illustrates what I've been saying in the Pedelecs forum, that the discomfort on poor roads experienced by many riders is entirely due to the unsprung front motor weight. The fork legs shimmy about fore and aft in exactly the same way as ever in this T bike Radical, but don't in any way affect comfort, handling or front braking performance.
The inner tubes are as before, Schwalbe's low loss types in the smallest profiles that I could get away with. At È3.99 these are far superior to the usual tube stock, the ones on the Q bike having run now for about two months, showing no signs of any pressure loss.
The inner tubes are as before, Schwalbe's low loss types in the smallest profiles that I could get away with. At È3.99 these are far superior to the usual tube stock, the ones on the Q bike having run now for about two months, showing no signs of any pressure loss.
21.6.2007
.
.
alloy dual thread hub, seen below, but the motor sideplate had to prepared for it by grinding away the projection at the side plate centre. To do this I packed hard wax against the side plate bearing, then ran the torq front wheel at full throttle with the bike upside down, using it as a capstan lathe, facing off the projecting alloy and steel area with an angle grinder to achieve a flat face for the freewheel mount. To achieve this I'd already shifted the motor bearing inboard a fraction, removing a spindle internal spacer to allow for the new position.