WIRING & ELECTRICAL
The motor connections within the sleeving comprise three thick power leads with plug in connectors inside the thick point of Torq's front fork heat shrink sleeve and five thin Hall effect control leads which are soldered at the same point. These are normally connected like to like colour. However, a few motors have a different colour coding on the power leads, so note the colour connections if ever you disconnect the fron wheel and motor completely. If you fail to note them and find the reconnected motor just hums without turning the wheel, it will be one of these differently coded motors. Here's the revised connections for most of these:
Bike Yellow connect to Motor harness Green.
Bike Green connect to Motor harness Blue.
Bike Blue connect to Motor harness Yellow.
The Hall effect leads are the ones to check for continuity at the soldered point if a loud ticking or knocking noise from a Torq motor is experienced. In the unlikely event that a break is accidentally caused inside the motor due to something catching and pulling on the leads at the exit from the motor, the spindle and armature assembly will need to be replaced as the armature windings are sealed.
The most likely repair that might be needed will be due to ingress of water corroding one of the connection points. This is most likely in the bottom bracket area given it's exposure, but could also be at any of the other exposed areas like the handlebars. The Cable Routing Diagram may help you with tracing a problem. If you're suffering cutting out which unplugging and replugging the battery does not cure, a corroded connection is the most likely cause. Pushing and twisting the various connector points may cause the fault to disappear and reappear, helping you to locate which is at fault. Otherwise, patiently checking the security of each in turn may be necessary. Irksome and time consuming as this might seem, if you're suffering damp problems it's time well spent since you can then effect a permanent cure at each point.
To tackle suspect contact points, first remove the battery. Then carefully cut away the heatshrink sleeving, taking care not to cut any wires or their insulation. Where possible, clean the connector parts and tighten the connection where necessary, if not, unplug and replug a number of times to bed in the connection. Ideally, use a light application of contact cleaner* during the plugging procedure. Once you are satisfied that the connection is good, seal the connector again. You could use one of the heatshrink sleeves that came with the bike, but a much more effective seal will be obtained using self-amalgamating tape* in the manner I've described further down.
The asterisked items can be obtained from any of Maplins national stores, or you can buy by telephone or online. Maplins number is 0870 264 6000 and their website is www.maplin.co.uk , from either you can find your nearest store if you wish to buy in person. The part numbers of the items I've recommended are:
Contact Cleaner: JP 17 T
Self Amalgamating Tape: KW 29 G
Using these two products or similar will ensure the connection remains sound.
Use the self amagamating tape as shown by stretching it considerably to about two thirds of it's original width as you bind the connection, overlapping each successive turn. The tape will grip the connection securely and the overlaps will merge into continuous rubber with time. Within about 24 to 48 hours it will be impossible to unwind the turns and the joint will be water resistant with the contact cleaner sealed in, preventing any more corrosion.
Updated 8.10.2006
.
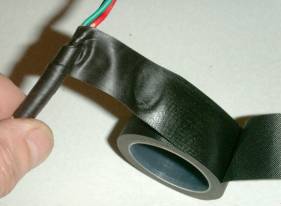
The additional tape layer you see coming off at the right is the plastic interleave which prevents the tape amalgamating while still on the roll. You may have some small voids left between the exit of multiple wires from the tape seal in which case you can ensure a perfect seal by applying any outdoor grade builders sealant such as silicone rubber.
The brake lever cutout switches are sealed from the atmosphere and are very unlikely ever to give trouble, but if ever one does, you could replace it. That's not what I'd do though. Motorcyclists, and I've been one for most of my life, don't have brake cutout switches, and their machines have up to two hundred Torq motors of power output and are capable of up to 190 mph or more. Continental pedelec eZee bikes don't have them, and in any case, your other brake lever would still cut the power. To cope with a faulty open circuit lever switch, you can just cut off the cable at the lever entry and short the two wires at the battery meter end.
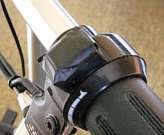
To do that, unclamp the battery meter from the handlebar, then pull out the large rubber grommet from below. Inside you'll see where the two brake cutout cables terminate in small white nylon plugs on a circuit board. Pull off the offending cable's plug, then cut back the cable and discard it, leaving about one centimetre of the two wires sticking out from the plug. Bare the insulation of those wire ends a little, twist the wire ends together and solder them. Then using either snipe nose pliers or tweezers, replace the plug onto the circuit board, observing the side tongue placement in the groove. Take care not to touch the circuit board components since some are static sensitive and can be destroyed by contact.
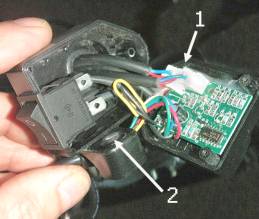
If you find it difficult to return the nylon plug, or you prefer to do the whole job inside the battery meter, remove the three self tapping screws from the lower cover of the meter and part the two halves. Take care not to lose the captive nut (2) which will probably fall out at this point. The photograph also shows the two white nylon plugs (1) and the brake cutout leads going to them, so identify the one you want. Unplug it now before cutting the lead to avoid static transmission into the circuit board.
Some Torq models only need the plugs disconnecting. On others where that cuts the power, cut the lead at the end of the black outer to leave the inner wires on the plug (the colours can change), then bare the ends, twist and solder the red blue pair of the plug together before replacing the plug. Then reassemble, remembering to replace the captive nut in it's recess and the side cable small grommet slotted in correctly. If you find it difficult to push the large grommet back into place after, moisten it's plug-in surface slightly with a faint wipe of water to lubricate it's entry.
The 50cycles website carries a tip from eZeebike for rotating a lightswitch equipped twistgrip to place the switch pointing rearwards to reduce it's vulnerability to water ingress. If you have to ride in the rain though, you may wish to waterproof it, so here's a very cheap and simple way to do that.
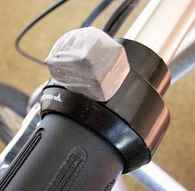
First buy some disposable vinyl gloves, I bought a packet of ten from Sainsburys for Ł1.25. Now cut about 20 mm off the end of a finger or thumb when no-one's wearing the glove, then stretch it over the lightswitch as shown in the two photographs at the right. The switch can be easily operated through the thin vinyl and it's totally waterproofed.
This vinyl cover will be very hard wearing, but you still have forty-nine spares on the ten gloves, or they can be used for mucky jobs like chain cleaning. Alternatives you can use are tips from household rubber gloves, surgical gloves or even the tip of a condom. (They make black ones too!) Finally, if the cosmetics concern you, see below.
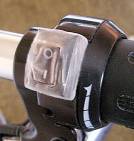
Take some black polythene such as heavy duty refuse sack and cut a rectangle approximately 30 mm by 38 mm. Place it over the switch, then fold down the sides and mitre fold the corners, parcel fashion. Fasten the edge to the switch body with a strip of pvc insulating tape cut to about half width. The neat appearance is shown at the right.