MODIFICATIONS
Mudguards
Bar equipment protectors
Close coupled horn and bell
Twistgrip with improved control
Waterproofing the light switch
Bar equipment protectors
Close coupled horn and bell
Twistgrip with improved control
Waterproofing the light switch
Current Torqs are now equipped with full mudguards, but earlier models had part mudguards which shook and rattled due to insufficient anchorage and gave little protection. To correct this you can easily fit a better mudguard set, using just a new front mudguard. To start with, buy a set of black mudguards, plastic will do ok. Now measure the distance from the back of the front fork head to the first rivets of the front mudguard and note it. Remove the two crosshead screws each side that clip the front mudguard support rods into the slot of the fork mounts. Open up the slots with a screwdriver and remove the mudguard. Now drill out the four rivets to release the front mudguard crossplates from the guard. Offer up the plates to the new front mudguard, observing the distance you noted from the new mudguard's L bracket to the front rivet point. Mark and drill the new mudguard, then pop rivet the crossplates to the guard. You may need to file or grind off rivet surplus from within the mudguard before fitting the new mudguard to the bike, using the headlamp bolt to anchor the L bracket.
The part mudguard that you removed from the front can now be added to the front of the existing rear mudguard to both extend it and to help anchor it properly. Using the frame fastening points provided adjacent to the stand and on the serial number plate at the rear of the battery, you can fasten the piece of front mudguard using L brackets. You may find suitable items in a local DIY, but if not, Maplin's stores have a suitable item, part code JP 12 N, you'll need two of these. Maplin are at www.maplin.co.uk , telephone 0870 264 6000.
The part mudguard that you removed from the front can now be added to the front of the existing rear mudguard to both extend it and to help anchor it properly. Using the frame fastening points provided adjacent to the stand and on the serial number plate at the rear of the battery, you can fasten the piece of front mudguard using L brackets. You may find suitable items in a local DIY, but if not, Maplin's stores have a suitable item, part code JP 12 N, you'll need two of these. Maplin are at www.maplin.co.uk , telephone 0870 264 6000.
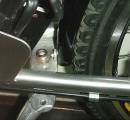
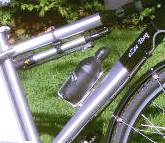
The first photograph at the right shows the lower fixing point on the stand bracket. The bolt needs to be very short and inserted from within the mudguard with the nut next to the stand fixing bolt.
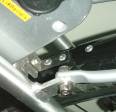
The second photograph shows the upper fixing with an L bracket to the hole in the serial number plate. The end of the stub mudguard sits just under the front of the existing rear mudguard and is fitted to it with a single pop rivet, the spaced right hand one of three rivets in the photograph.
The third photograph shows the addition of an L bracket from the rear of the existing mudguard to the reflector mounting to prevent any rattling at this point. To fit this, you need to remove the reflector, drill and countersink the reflector mounting plate and use a countersunk bolt, before returning the reflector to the bike.
With this modification completed, the mudguards are very rigidly mounted and completely shake and rattle free, in keeping with the rest of the bike's silence.
Have you ever been upset by the way the contents of the handlebars get trashed when the bike is inverted to repair a puncture etc on the road? I have, so with this new bike I decided to do something permanent about it. My solution was to fit a pair of suitable ultra light bar ends inboard to form two front support points so that the bike sits on these and the rear rail of the carrier, avoiding damage to the handlebar contents and the saddle. Here's the photograph:
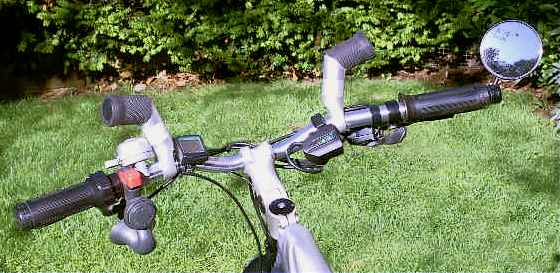
You can see how the comprehensive accessories are all protected from ground damage, even the bar end mirror. The cranked bar ends I used are Halford's "Bike Hut" brand and weigh only a few grams. Removing just one cable tie I was able to easily remove the outer bar fitments in order to slide on the bar ends. If you've never removed or fitted rubber grips before, use some soapy water to allow the rubber to slide easily. To remove the existing right hand handgrip, slide a thin screwdriver between the handlebar and grip, apply a little soapy water and rotate the screwdriver so that it winds around the handlebar, spreading the water. twisting the grip will then free it for it to be slid off. I added the rubber handgrip pieces on the bar ends to protect those as well.
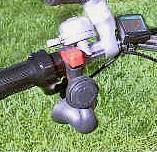
In my area with many dual use pavements, a bell is necessary at times to give a gentle warning of approach from behind, and the way I use it in these circumstances does not give rise to annoyance*. However, on a fast bike like the Torq, a bell is useless when approaching at well over 20 mph and a pedestrian is intent on crossing the road diagonally away from me, using ears only, as so often happens to cyclists. Therefore a loud horn is also needed, but how to accomodate both? Here's my answer, the Torq's standard bell is close coupled with a very loud American air horn, so that thumb forward operates the bell, while thumb down operates the horn's red push pad. The air reservoir is mounted in the bottle holder, (let's face it, a water bottle on a limited range electric bike isn't vital!), and the air pumped into the reservoir using the bike's own pump, The reservoir is normally a clear plastic bottle, but I've covered mine with a tailored and sewn on black leathercloth cover. This horn is sold in many independent British bike shops.
*So how do I avoid the bell giving annoyance on dual use pavements? Quite simply, I slow to near walking pace as I ring the bell, then as the person looks round and steps away, I smile and say "Thank you, sorry to disturb you". The response is always friendly, often with favourable comment, such as on one occasion when a lady said "Thank you for using your bell". It doesn't get better than that, pedestrians and bikes can exist in perfect harmony with a little effort.
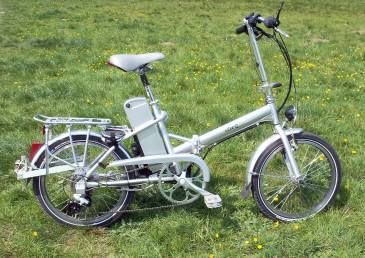
If you want to fit a speedometer to a Quando, probably to keep check on mileage per charge, lead length can be a problem as it's a long way from the small wheel fork to the tall handlebar. However, the Velo 5 model that's fitted to the Torq as standard has a lead just long enough for a rigid front fork Quando.
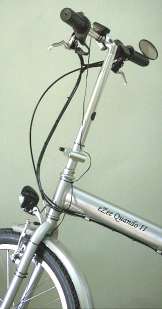
The photograph shows the detail. The pair of black tie wraps just below the V brake secure the actuator as high as possible to minimise lead use. The next tie wrap up on the fork secures the lead before it passes behind the bike cables. The lead is then tie wrapped just below the headstock adjuster, leaving some slack for steering. The speedo head is mounted inboard on the left handlebar with the lead straight down to a tie wrap just above the hinge. This then leaves sufficient lead loop to allow for folding without the lead fouling the hinge in any way. If you wish to have the average journey speed recorded as well as the maximum speed and the odometer readings for journey and overall use, buy the Velo 8 model instead.
Although the suspension Quando I isn't suitable for towing a trailer, the Quando II is ideal for it, and can take all standard types of trailer attachment. The spindle nut will accept plate attachments, the rear triangle frame is suitable for the clamp plate type of mount, and for anyone over five feet three inches, there's enough seat tube exposed for a seat mount attachment.
However, those who've seen my trailer on my Twist site will know that I use a unique centre rear towball to give perfect tracking on the shared use cyclepaths in my area. I do this to make absolutely certain that there's no risk of the trailer touching a pedestrian on these busy paths. The original spring secured ball hitch I got from a French seatpost attached trailer and modified it for my Lafree Twist, but this time I needed to make a new one from scratch using whatever I had to hand.
However, those who've seen my trailer on my Twist site will know that I use a unique centre rear towball to give perfect tracking on the shared use cyclepaths in my area. I do this to make absolutely certain that there's no risk of the trailer touching a pedestrian on these busy paths. The original spring secured ball hitch I got from a French seatpost attached trailer and modified it for my Lafree Twist, but this time I needed to make a new one from scratch using whatever I had to hand.
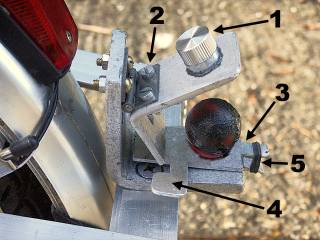
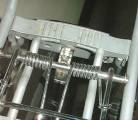
Here's the details of the finished product in action. With the cuphead of the trailer bar on the ball, the knob on the L shaped securing plate (1) is pressed down, pivoting on the hinge (2) until it's tail passes the end of the latch plate (3). the rubber band at (5) causes this to rise and lock the securing plate in place. The bolt that holds the towball has a square nut just below the ball, and the latch plate has a square hole to match, leaving it floating but held in fore and aft alignment
Here's the hitch in the locked position which holds the trailer securely in place. To release it, a press on the finger pad (4) allows the securing plate knob to be pulled up to release the trailer. These components all made from scrap bits of dural and other odds and ends. The ball head was an old threaded plastic handle knob, filed and then turned into a correct size ball, a lathe is handy here, but a vice mounted drill can suffice with safety precautions observed.
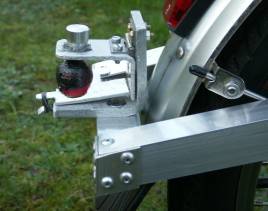
Here's the side view, showing the DIY 1" right angle alloy that forms the main attachment arms, and the 1/2" right angle strip that forms the vertical load strut from the rear carrier tube. It might not look strong, but I've been using this type of carrier mounted hitch for four years on my Twist with this trailer and some very heavy loads with no trouble whatsoever.
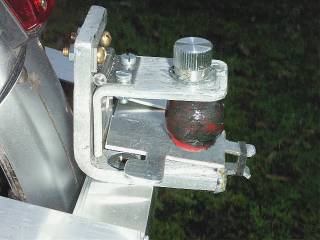
And finally the corner detail, showing the pop rivet construction here, using internal and external gusset plates cut from the dural angle strip. The whole assembly adds very little weight, and since the bike normally has panniers attached, much of it is hidden. I'm going to add rubber corner protectors to ensure the safety of pedestrians who might walk too close.
22.1.2007
.
.